
In this post, I’ll be sharing how to make an embellished drawstring bucket bag, including the pattern and step-by-step sewing tutorial.
Disclaimer: This post may contain affiliate links. If you make a purchase through a link, I may receive a commission at no extra cost to you.


Welcome, craft lovers and sewists! In today’s post, we’re turning just a few snippets of fabric and some trimmings into an amazing drawstring bucket bag.
I like to think of this type of sewing project as a playground for imagination. Each embellishment you pick adds personal charm to your masterpiece. Whether you’re dreaming of a bag covered in sparkly sequins or a more laidback everyday accessory, it’s all about making it truly yours.
You may like: DIY Fabric Knot Bag: Pattern and Sewing Tutorial
This post will guide you through drafting a pattern and step-by-step sewing instructions. So gather your materials – your fabric, lining, and all the fun add-ons – and let’s dive right in!
How to Make an Embellished Drawstring Bucket Bag

Materials:
- Main Fabric: Make sure it’s a woven (non-stretch) material.
- Lining Fabric: Choose a contrasting color/pattern or use the main fabric – must also be a woven (non-stretch) material.
- Fusible Interfacing
- Assorted embellishments: Ribbons, sequins, beads, etc.
- Drawstring material: Cord, ribbon, rope, etc.
- Pattern Paper or Kraft Paper
- Ruler
- Scissors
- Fabric Scissors
- Pen
- Pins or sewing clips
- Sewing Machine
- Thread
- Fabric marker or pen
- Iron
The Drawstring Bucket Bag Sewing Pattern:
First things first, let’s create a pattern! You can use pattern paper with pre-measured dots for ease, or get creative with kraft or wrapping paper.
Step-by-step Instructions:
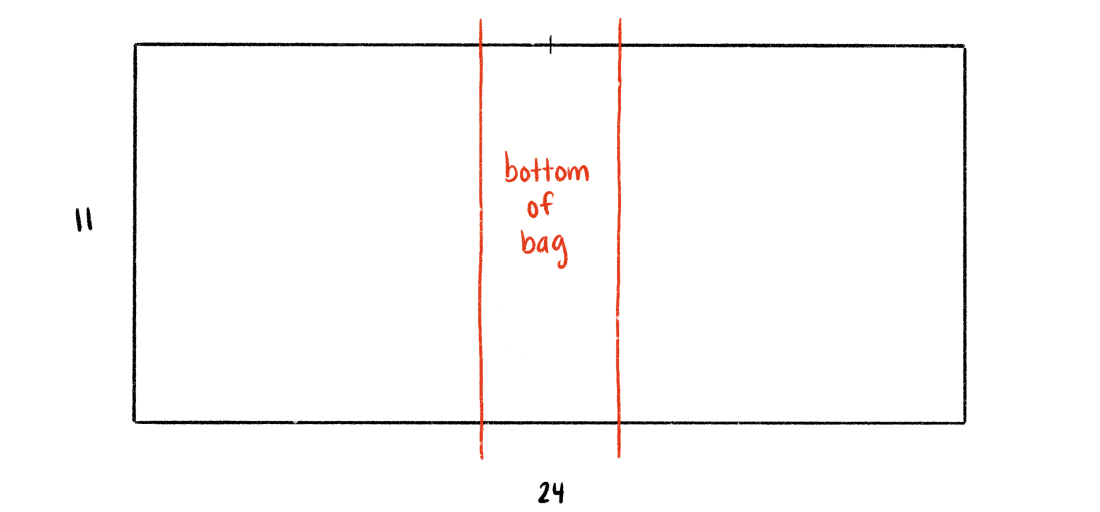
1. Draft the Pattern: Begin by sketching your vision onto pattern paper, creating a rectangle measuring 11 x 24 inches. This basic shape will serve as the foundation for your creation. Feel free to adjust the dimensions if you wish to make a smaller or larger bag.


2. Cut the Fabric: Using sharp fabric scissors cut one rectangle from the main fabric and one from the lining fabric.


3. Add Embellishments: Here is where your bag’s personality truly shines! Decorate the main fabric, leaving the central 4 inches (the bag’s bottom) free.
Note: the center of this area will become the bottom of the bag, and the left and right edges will become the top of the bag. So be sure to mirror the embellishments on either side so that they line up properly and face the correct way once the sides of the bag are sewn in the upcoming steps.


For my bag, I sewed three rows of jacquard ribbons (using my sewing machine to sew a stitch along the edges) to create a large decorative focal point, and hand-stitched iridescent paillette sequins in a grid pattern (similar ones linked here).
The design possibilities are endless here, you can add beads, tassels, fringe, apliques, and any other embellishment to enhance the charm of your bag.
Here are some fun trim options for inspiration:


4. Infuse Stability: Cut a piece of fusible interfacing measuring 10 x 18 inches. This will act as a stabilizing element, providing strength to your bag. Adhere it to the center of the back of the main fabric, using an iron with a protective layer of muslin or scrap cotton.


5. Sew the Fabric and Lining: Align the main and lining fabrics with the right sides facing each other. Pin and sew along the short sides with a 3/8-inch seam allowance, then press the seams open. This process effectively binds the two layers together.


6. Mark the Drawstring Casing: On the main fabric side, mark a line 1 inch from the seam, followed by another mark 1.5 inches further. These marks will guide the creation of your drawstring casing—a means to securely close your bag.
7. Prepare for Transformation: On the lining side of the fabric, mark a 3-inch and a 4-inch section to remain open for turning the bag right side out.


8. Sew and Shape: Sew along the long sides of the rectangle, leaving gaps between the markings created in step 7 (as shown in the blue dashed lines in the diagram above). Trim the corners diagonally, then pull each corner to create a 2-inch diagonal line, pinning and sewing along the lines.


Trim excess fabric leaving half an inch of extra fabric. This step will create a flat bottom for the bag.
9. Turn the Bag: Use the opening in the lining to turn your bag right side out.


10. Finish the Bottom: For added durability, insert a 4 x 6-inch piece of cardboard between the layers, then close the lining gap with an edge stitch. Tuck the lining into the main fabric – now the shape of the bag is starting to come together.

Press the top edges of the bag. Optional: add a stop stitch along the entire top edge for a clean finished look.


11. Create the Drawstring Casing: Measure and mark 1 inch from the top of the bag, followed by an additional 2 inches further down. Sew around these marks to form the channel for the drawstring. Note: this drawstring channel should line up with the 2 gaps on the side seams that were left open when sewing in step 8.

12. Attach the Straps: Choose your preferred strap style – fabric, ribbons, chains, etc. Measure and sew them to the inside along the bottom of the drawstring casing.
I chose to create short handles out of the same fabric as the body of the bag. But you can also adjust the strap length or use pre-made handles to personalize your bag even further.
Here are some handle options for inspiration:


13. Craft the Drawstrings: Cut two cords, each measuring 27 inches. Using a safety pin, guide each cord through the casing from opposite ends, and consider adding tassels or beads for a whimsical finishing touch.


Pull opposite ends of the cords to close the drawstring, and ta-dah, you’re done!


Tip: if you have alcohol markers, consider using them to create a custom color for your cording!


And there you go! You’ve just created a drawstring bucket bag that serves not only as a fashion statement but also as an expression of your creativity and individuality.
Whether you customize your bag with opulent velvet for an elegant evening event, or opt for lightweight cotton for your daily adventures – the possibilities are limitless. Happy crafting!
Looking for more inspo!? Check out my Pinterest for tons of lifestyle, DIY, and crafting inspo… updated daily!
This post was all about how to make an embellished drawstring bucket bag. If you like this content, check out these posts below!
– How To Make a Reversible Fabric Obi Waist Belt
– DIY Fabric Knot Bag | Pattern & Sewing Tutorial
– DIY Pearl Scarf Necklace | A Classic and Versatile Accessory
Xx- Laura
PS – Follow along on Instagram for more posts and stories related to this topic!
PIN THIS FOR LATER


